Class RegistrationFrame
The class RegistrationFrame
provides a tool for geometrically transforming a set of images into a reference
coordinate system defined by one of the image. The tool provides an interface
to (1) a manual selection of matching points (also denoted as control points)
in reference and processed images, (2) an affine transformation of images based
on computed parameters from the control points and (3) an interactive visual
overlay of the reference and transformed images.
Description:
The registration problem arises due to (a) multiple image sensors viewing the same spatial area, e.g., visible spectrum and thermal infra-red images, (b) one sensor viewing the same spatial area under multiple view angles in time, e.g., images from a robot-operated camera or (c) one sensor viewing multiple depth-adjacent spatial areas, e.g., cross sections of 3D medical tissues. Figure 1 illustrates these three registration problem scenarios. The last scenario is also frequently denoted as image alignment.
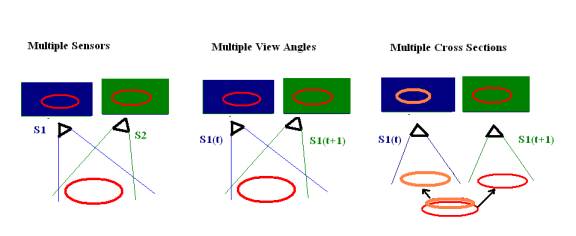
Figure 1:
Registration problem scenarios.
In general, image registration is understood as a coordinate transformation of one or many images into a reference coordinate system. The coordinate system of any image in the set of processed images can define the reference coordinate system. One should select a coordinate transformation model in such a way that it compensates for any expected image distortions due to sensor imaging, viewing geometry or object geometry. For example, this tools supports an affine transformation that can compensate for any rotation, translation and shear changes during coordinate system transformations. For determining the affine transformation parameters, a user can select a set of at least three control points in each image by finding salient matching features, for example, high-contrast corners or edges. Using the affine transformation model and a set of control points, we form an over-determined set of linear equations with the unknown transformation parameters. Solving the set of equations leads to coordinate transformation parameters. The computed transformation parameters can be stored to a file, loaded from a file and applied to any set of processed images.
Functionality Overview:
The Image Registration Tool provides the following main
functionalities:
- Input/output of single or multiple image files
- Loading single or multiple images
- Appending single or multiple images to a set of already loaded images
- Viewing thumbnails of loaded and appended images
- Saving registered (transformed) images
- Registration of multiple image files
- Selecting interactively control points in a pair of images
- Computing coordinate transformation parameters for the affine registration model
- Loading and saving transformation parameters
- Verification of registration
- Forming a composite image from a pair of reference and registered images
- Viewing interactively a composite image by changing registered image transparency in order to verify alignment of salient features with respect to the reference image.
Running Image Registration
Tool:
The Image Registration Tool provides three main functionalities, such as, input/output of image files, registration and verification of registration results. Figure 2 shows the graphic user interface (GUI) of the main window for the registration tool. This window has four buttons that map into the main functionalities (I/O - ”LoadSet”, “AppendSet”, Registration -“Registration” and verification - “Composite”). The button “Toggle Image Selector” shows or hides the thumbnail viewer when Images are loaded.
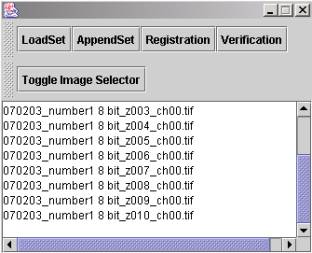
Figure 2: Main Window
To illustrate the use of the presented registration software, we list a typical sequence of steps that one would execute with the software.
1. Loading Images
a. Load a set of images by clicking the “LoadSet” button. A Thumbnail window (Figure 4) will appear with a set of loaded images.
b. Append a set of images if needed by clicking the “AppendSet” button.
2. Computing Transformation parameters
a. Launch the Image Registration Tool window (Figure 5) by clicking the “Registration” button.
b. In the Thumbnail window (Figure 4), choose two images for determining coordinate transformation parameters by clinking on a checkbox of a chosen image.
c. In the Image Registration Tool window (Figure 5), click the “Compute Parameters” button to open a Feature Selector window (Figure 6) with the two selected images (or click the “Load” button to load already pre-defined transformation parameters).
d. Selecting feature points
i. In a Feature Selector window (Figure 6), select at least three corresponding points in both images by left mouse clicking on the images at the corresponding locations. (You can magnify the image for more accurate selection by right clicking on the local region)
ii. Selected features can be undone or cleared by clicking “Undo” or “Clear” button
e. In the Feature Selector window (Figure 6), click the “Transform” button to compute the transformation parameters.
f. In the Registration Tool window (Figure 5), save the transformation parameters for future use by clicking the “Save” button.
3. Transforming Images
a. In the main window (Figure 2), load images to transform.
b. In the Thumbnail window (Figure 4), choose the images to transform by clinking on a checkbox of a each chosen image.
c. After computing or loading transformation parameters in step 2, run image transform by clicking the “Image Transform & Save” button in the Image Registration Tool window (Figure 5).
d. Type the file name suffix for the transformed images, and new files will be created in the same directory of the original images
4. Verifying Registered Images
a. Load the original image and transformed image for the comparison, and select the images in the thumbnail viewer (Figure 4)
b. Launch the Composite Image Viewer (Figure 8) to compare two images by clicking the “Verification” button in the main window.
c. In the Composite Image Viewer, one can slide bars to change the image transparency (bottom slider) and the image enhancement factor (right slider).
The detailed explanation of each step follows next.
Input/Output of
Single or Multiple Image Files
Image Registration Tool can load multiple images for image selection and comparison. Clicking the “LoadSet” or “AppendSet” buttons launches a new file selection window titled as “Open”. In the Open window, a user may load multiple images by holding “Shift” or “Ctrl” key. Using the “LoadSet” button loads multiple images and discards all existing images in the Thumbnail viewer. A user can preserve all existing image in the Thumbnail viewer and append new images by clicking the “AppendSet” button. Figure 3 shows an “Open” window.
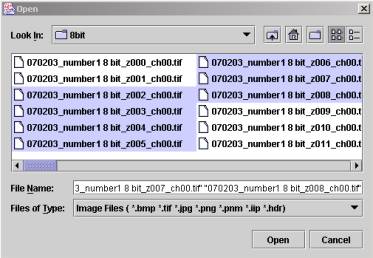
Figure 3: Image file selection.
After loading images, the Thumbnail window will appear for image browsing and registration selection. Figure 4 shows the Thumbnail viewer. By moving the scroll bar on the bottom of the viewer window, a user can browse the images and check the filenames for each image. The “Select” checkbox above each image is for selecting some particular images for image processing (Registration and Comparison).
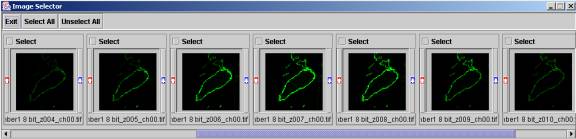
Figure 4: Thumbnail Viewer
Image Registration
By clicking the “Registration” button in the main window, one can launch the Image Registration Window (see Figure 5). The Image Registration Tool window consists of two panels, such as, “Image Transform” and “Transform Parameters”. The “Image Transform” panel contains buttons for computing; loading and saving transform parameters, and image transformation using the computed (or loaded) parameters. The “Transform Parameters” window shows the values of computed or loaded affine transformation parameters. “Send to Main” button is added for loading the selected image to “Image to Knowledge” Software.
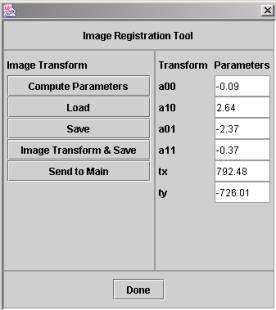
Figure 5: Registration Tool
In the Transformation Parameters panel, six values define the affine transformation model as following:
The x’ and y’ values are the transformed coordinates of the x and y spatial coordinate values. The four parameters, a00, a10, a01 and a11, represent a 2 by 2 matrix compensating for scale, rotation and shear distortions. The two parameters, tx and ty, represent a 2D vector of x and y translation.
·
Computing Coordinate Transformation
Parameters
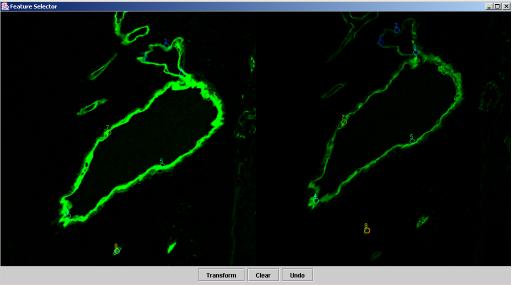
By clicking the “Compute Parameters” button in the Registration Tool window, one can launch the Feature Selector window for selecting transformation control points. Figure 6 shows the GUI of the Feature Selector window. The Feature Selector window displays two images before their registration, for instance, two images from adjacent spatial cross section of a 3D tissue acquired by a confocal microscope. A user can select at least three matching pairs of control points in both images to compute the affine transformation parameters. Each selected point is displayed as a colored circle with the index of the pair.
Note: The Feature Selector window size is optimized for 1280 by 1024 monitor resolution. For big images that do not fit in the current monitor, the software automatically detects the screen resolution and launch two scrollable windows for each image, and an example is shown in Figure 7.
 =
=
Figure 6: Feature Selector window.
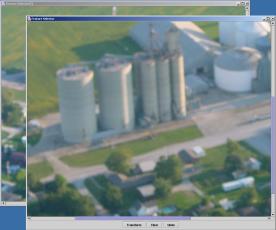
Figure 7:
Two windows feature selector mode
·
Transforming Images
Once the affine transformation parameters are determined, a set of images can be transformed and saved. A user can specify the suffix of the transformed saved images.
Verifying Registered Images
By selecting two images in the Thumbnail window followed by clicking the “Verify” button in the main window, one can compare transformed (registered) and reference images. Figure 8 shows the Image Composition window.
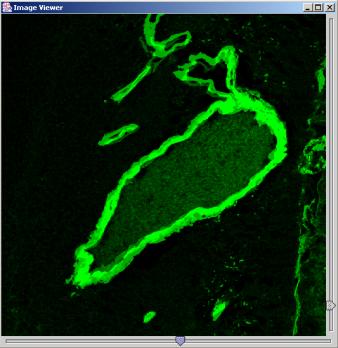
Figure 8: Composite Image window.
The bottom slider bar interactively changes the transparencies of the displayed images. Moving the slider bar to the left makes the first selected image from the thumbnail more opaque, and moving right makes the other image more opaque. If the images and their features are too dark then the right slider bar can be adjusted accordingly. This window enables users to verify the outcome of registration.