Description: The speech recognition tool was developed for robot teleoperation purposes and hence it is designed to recognize only a few words (robot commands). The SpeechRec tool execution consists of two phases. First, a set of training words (audio waves) is saved into a dictionary. Second, a new word is classified by matching against the words in a dictionary and the best match with its class label are reported. The execution can run in two modes, such as, a single word mode (an audio wave with one word is presented) or a multiple word mode (an audio wave with multiple words is presented, for example, in the case of continuous audio input).
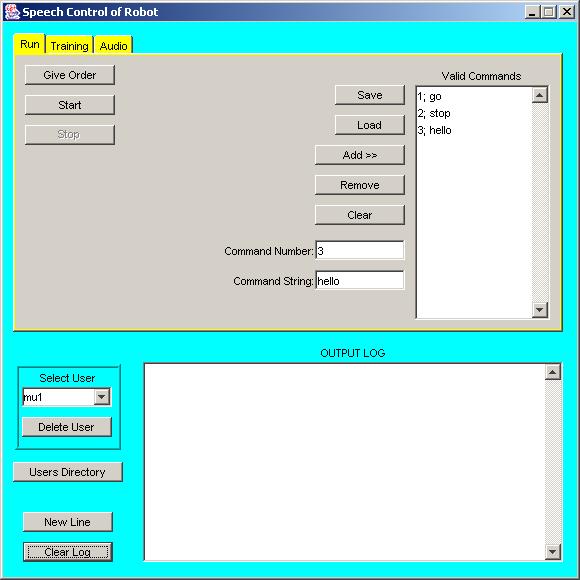
Setup: The frame of the graphic user interface (GUI) as shown above is divided into two parts. The top part contains 3 tabs (run tab, training tab, and audio tab), while the bottom part contains user information and a text output window.
First time users should follow these instructions.
1) Specify the directory for users.
To select this directory press the Users Directory button, then create and/or choose a directory. It is best to use a directory that stores no other folders besides the user folders.
2) Select current user in the Select User box.
Choose your user ID from the list, or type in a new ID and press ENTER.
3) Set up your valid commands in the Run tab. Set the text and positive integer representation for each word (or phrase) you want to be recognized. For example, let us assume that you want the word "hello" to be one of your inputs. In the command string box type "hello", and in the command value box type an integer value greater than 0, e.g., 3.
Note: 0 is reserved for unrecognized commands, and negative values are reserved for future use.
Press the Add >> button. The entry "3; hello" should be listed in the Valid Commands window. Similarly create new entries for each word (phrase) you want to use, but using a different positive integer (they don't have to be consecutive) every time. If you accidentally add a bad entry, click on it and press the remove button. After you added all wanted entries, press the save button, which will save all the information in the Valid Commands window into your commands file.
Training Phase: After you selected your user ID, you need to create templates or a dictionary of words to be recognized. It is possible to store a dictionary and re-load them in future.
1) Record and edit sample wave files of each word to be recognized.
Recording duplicates or triplicates of each word with slightly varying voice tone or pronunciation will improve word interpretation but it will also increase the classification time in the second phase. The recording can be done with the Audio tab's Record button or with any other software, such as Windows Sound Recorder. After the files are recorded each one should be resampled to 8-KHz, 8-bit, mono waves by setting these parameters in the 3 boxes on the right of the Resample button (or using another software). Use the Save Wave button to save each wave. It is strongly recommended that each wave be manually edited to remove silence and noise in order to clean the dictionary word defintions. One can use a wave editor for this purpose.
2) Create a training file from the Training tab, and generate the templates with the Train button.
This is similar to creating a file with valid commands. In the File Name box enter the wave file name that stores a word (or phrase), in the Command String box enter the text of this word, and in the Command Number box enter the number that represents the string as defined in valid commands in Run tab. Then press the Add >> button to add the entry to the list in the Training File window. For example, one can use "hello1.wav", "hello", "3" to go along with the command binding in step 3 of the Setup section. After adding all entries, press the Save button to save the contents of the Training File window into your training file.
3) Train the data.
Press the Train button to generate the templates. Look at the OUTPUT LOG window to see how many templates were created, or to see error messages that prevented the creation of template files. There should be one template file for each entry in the Training File window. Note that old templates are deleted before new ones are created. Templates are saved using the .lfcc extension.
Classification Phase: Once you have generated templates for the words to be recognized, you can classify new wave inputs. The software supports three classification methods. Due to the fact that any microphone processing is set to 8-KHz, 8-bit, mono, the templates as well as the new audio waves should also be sampled at the same rate otherwise the classification methods 2 and 3 would not work.
Ranked from highest success rate to the lowest, the methods are:
1) Use the Training tab's Classify button for single file classification.
You can record and resample wave files to match the sampling rates of the wave files used for creation of the templates. Enter the file name you want to classify into the File Name box (.wav extension is not necessary) and press ENTER or the Classify button. The OUTPUT LOG window will display information about the file, either it was not found, or if it was found the distance value for each template is shown, along with the final classification and the number of templates the file was compared to.
2) Use the Run tab's Give Order button for single microphone input classification.
It is assumed that the templates are sampled at 8-KHz, 8-bit, mono. After pressing the Give Order button, there is a two second time interval for recording a word. At the end of the time interval, the word is classified. To change the time from 2 seconds to something else manually edit the "defaults.txt" file in your userID subdirectory of the users directory. Within that file, change the default value "miliseconds=2000" to "miliseconds=#" where # is an integer value of miliseconds to record. If there is no such default value in the file add it as a new line somewhere between the [defaults] and [end] tags.
3) Use the Run tab's Start and Stop buttons for continuous microphone input classification.
It is assumed that the templates are sampled at 8-KHz, 8-bit, mono. This method is very demanding on system resources and may not work on slower computers because wave inputs from a microphone are being continuously resampled, filtered and classified. To begin this method press the Start button. The continuous processing threads start and one can now speak into the microphone. Any word recognition is displayed in the OUTPUT LOG window. If you wish to stop the processing, press the Stop button.
User Information and Output Window:
Here you can change the current user, and see any output messages that result from your interaction with the GUI.
OUTPUT LOG window: Displays messages from certain events and button presses. You can scroll it up and down to see old messages. There are two buttons associated with the OUTPUT LOG window, found on the left side of the window.
Clear Log button: Completely erases all information in the OUTPUT LOG window.
New Line button: Add a blank line to the end of the text in the OUTPUT LOG window, that can be used as a separator for easier viewing
Delete User button: Remove the selected user from the combo box. The folder with the user's information will not be deleted. When the users directory is chose again, or when the software is run again the user names removed with just this button will reappear. To permanently remove users, delete the folder with the same name as their user ID within the users directory by using the operating system's commands.
Users Directory button: Select a folder in which the folders with each user's information are stored. Click the button then navigate through the directory structure, select the folder you want and press Open.
Select User selection box: Click on the down arrow to select your user ID. If you are a new user type your ID into the box then press ENTER. ID's for different users must be unique, so if the ID you want to use is taken either append a number or pick another ID. If your ID isn't on the list and you are sure you created it, use the Users Directory button to find the location of the users folder.
Run Tab:
The run tab is used to classify sounds through the microphone and to create string to number bindings for commands. See sections 2 and 3 of Classification Phase.
Give Order button: Press it and say one word (phrase) into the microphone. The microphone grabs 2 seconds of speech which is then classified based on the created templates. To change the time that is recorded to something else than 2 seconds, edit the "defaults.txt" file and add the line miliseconds=#, where # is an integer (default is 2000ms = 2 seconds).
Start button: Starts a continuous processing of microphone input from user and does automatic classification of the sounds. Very demanding method on system resources.
Stop button: Stops the continuous processing of microphone input from user.
Save button: Saves the contents of the Valid Comands window to the default commands file for the selected user.
Load button: Loads the contents of the selected user's commands file to the Valid Commands window.
Add >> button: Adds the entry typed into the Command Number and Command String fields to the Valid Commands window. You must press Save to make the changes to the commands file.
Remove button: Removes selected entry(s) from the Valid Commands window. To select multiple entries, use Shift or Ctrl keys. You must press Save to make the changes to the commands file.
Clear button: Removes all entries from the Valid Commands window. You must press Save to make the changes to the commands file.
Command Number field: Integer representation of the word (phrase) you want the system to recognize.
Command String field: Text representation of the word (phrase) you want the system to recognize.
Valid Commands window: Scrollable window displaying list of all text and integer bindings. The format of each line is "Integer value, text string bound to this value."
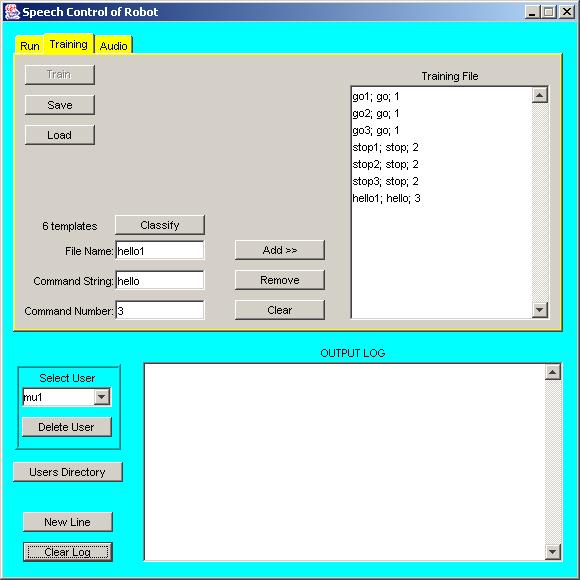
Training Tab:
The training tab is used to create template files, which are the basis of the speech recognition system. See steps 2 and 3 of Training Phase
Train button: Performs training by extracting audio wave features.
Save button: Saves the contents of the Training File window to the default training file for the selected user.
Load button: Loads the contents of the selected user's training file to the Training File window.
Add >> button: Adds the entry typed into the Command Number, Command String and File Name fields to the Training File window. You must press Save to make the changes to the training file.
Remove button: Removes selected entry(s) from the Training File window. To select multiple entries, use Shift or Ctrl keys. You must press Save to make the changes to the training file.
Clear button: Removes all entries from the Training File window. You must press Save to make the changes to the training file.
Classify button: Classifies the file specified in the File Name field.
File Name field: Wave file name (.wav extension not needed), that
Command Number field: Type the integer corresponding to the word (phrase) of the wave file in File Name field. Pressing the ENTER key on a keyboard will automatically fill in the Command String field with the assigned text, as specified in Valid Commands window of Run tab. If "Unknown" appears in Command String field after pressing ENTER, then this number is not bound correctly.
Command String field: Type the text corresponding to the word (phrase) of the wave file in File Name field. Pressing ENTER will automatically fill in the Command Number field with the assigned integer, as specified in Valid Commands window of Run tab. If "0" appears in Command Number field after pressing ENTER, then this text string is not bound correctly.
Templates text: The number of templates that exist for this user. This is displayed to the left of the Classify button.
Training File window: Scrollable window displaying list of all wave files that are to be used in creating templates. The format of each line is "File name (with or without .wav extension); text string representing the sound; number bound to the text string."
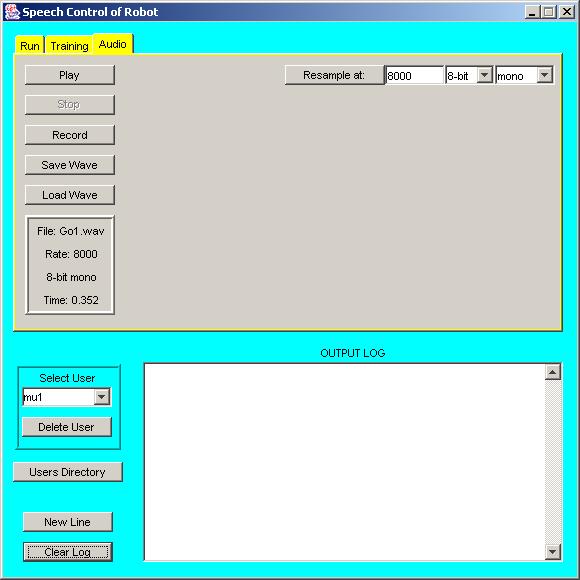
Audio Tab:
Audio tab is used to record, play and manipulate wave files.
Play button: Play the current wave through the speakers. The current wave's information is displayed in bottom left corner of this tab.
Stop button: Stops the recording.
Record button: Start recording a wave from the microphone, to stop recording press the Stop button.
Save Wave button: Save the current wave to a file that you choose. The current wave's information is displayed in bottom left corner of this tab.
Load Wave button: Load a wave from a file that you choose.
Resample at: button: Resamples the current wave according to the 3 fields on right. The current wave's information is displayed in bottom left corner of this tab.
File Information box: This box on bottom left of the tab shows (1) the file name if the wave is saved (NA if no wave is present, or UNSAVED if the wave exists but is unsaved), (2) Rate: sampling frequency in Hertz, (3) sample size and channels, and (4) Time: length of the wave in seconds.
Sampling Frequency field: Frequency in Hertz (Hz) that you want to resample a wave to. This should be between 8000 and 48000.
Sampling Channels selection box: Number of channels that you want to resample a wave to. Mono is 1 channel, Stereo is 2 channels.
Sample Size selection box: Number of bits per sample of one channel. Either 8 bits or 16 bits.
Release notes: The software has been tested with the Audio-technica equipment, Model ATW-T310, on a Windows OS machine.