While any unsupervised segmentation algorithm has to estimate the optimal number (or numbers) of image segments, their spatial locations and intensity profile characteristics, this tool allows a user (1) to specify initial spatial locations (seeds) of desired image segments (regions) by a mouse click in the original or mask image, (2) to select minimum similarity of interior pixels forming a contiguous segment, (3) to remove holes from segments that are introduced due to speckle noise or other sharp intensity discontinuties, (4) to assign higher level labels to each formed segment (e.g., grass or sand), and (5) to merge segments that are heterogeneous in terms of intensity profile but belong to the same segment conceptually. Next, we describe how to form a mask and take an advantage of the aforementioned capabilities using this tool.
The dialog of the supervised segmentation tool is shown below.

Setup and Run: After launching the dialog, a user will see a new frame displaying the current mask with only one label. By clicking anywhere in the original image and pressing the button "Segment From Original", the region growing algorithm will form a contiguous region (segment) that contains pixels with intensity values less different from the mouse selected one than the value of a threshold. The threshold value can be modified by moving a slider bar denoted as Delta or by entering a new value in the edit box denoted as Value in the Threshold area of the dialog. The distance between any two pixels is computed using an Euclidean distance measure.
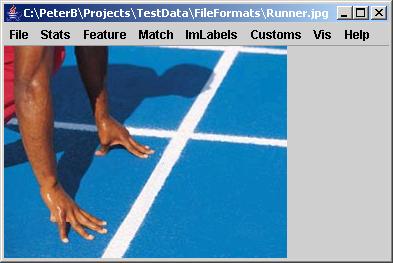
Lest us assume that we try to segment the image of a runner shown below.
If the obtained segment is satisfactory then it can be added to the final segmentation by clicking on the "Add Change to Final" button. The radio buttons "Intermediate Mask" and "Final Mask" allow to switch the mask visualization between the intermediate and final segmentation results.
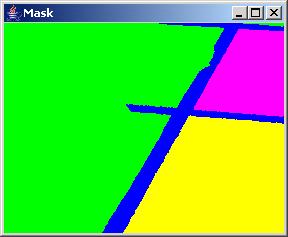
It is possible (and sometimes desirable) to select the region growing origin in the mask image. One would mouse click in the mask image at a selected pixel seed location and then press the button "Segment From Mask" to obtain an intermediate segmentation results starting from the given location. An example of intermediate segmentation is shown below.
A user might want to annotate each segment with its abstract meaning since the abstract meaning is usually very hard to obtain directly from image segment characteristics. This is enabled by typing a name in the "Name" edit box for the associated segment described by a value in the "Value" edit box of the "Label" dialog area. With the drop down menu inside of the "Label" dialog area, one can select already used labels and modified their names. In the "Auto Increment" mode, the values will increase by one and the assigned labels will be set to "unlabeled". Segment names and their pixel counts are reported in the text area as it is shown in the dialog snapshot above.
In the presence of speckle noise, the obtained segments might have undesirable holes since the noise pixels are outside of the allowed range of values and increasing the threshold value would lead to merging multiple segments of different abstract meanings. The "Noise" part of the dialog allows to perform noise removal (or removal of segment holes). The "Size Threshold" value denotes the maximum size of a hole that would be considered for removal. The "Half Window" value denotes a half size of a spatial kernel (neighborhood of pixels) that is used for filling the exiting holes of size less than the "Size Threshold" value. This is critical when holes occur at the border of two labeled segments. The "Iteration" slider bar is for chosing the number of iterations that the noise removal step should be applied. Two examples below show a segment with holes and without holes after noise removal.
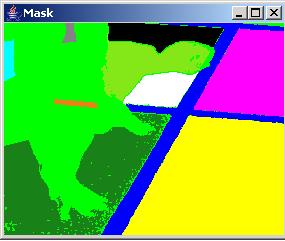
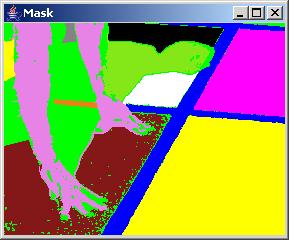
It is often the case that a desired segment contains heterogeneous intensities and cannot be created by choosing a single threshold and a pixel seed, for example the hands of a runner in the sample image presented above (see obtained labels below). In this case, merging of multiple segments can be achieved by selecting a label in the "Label" dialog area, choosing a pixel seed location and adding the obtained regions into one segment. Although this procedure can lead to segments that are not spatially contiguous, the formation of such segments is supported because of higher level abstract labels might need such representation.
If the original image contains more than one band then the Euclidean distance threshold for region growing can be replaced by a vector of values containing one threshold per band. This choice of a threshold vector as opposed to a threshold value can be achieved by switching the drop down menu from "Sphere (Radius)" to "Box (Dimension)" in the Threshold area of the dialog. The slider bar "Use Bands" is enabled in the "Box (Dimension)" mode and different threshold values can be set for each band. This option could be used, for instance, if its is desired to obtain a segment from a RGB image that contains red color pixels (red band threshold is set to 0) with a range of green and blue shades (green and blue band thresholds are set to 50).
Finally, the resulting mask image can be saved using the "Save" button. If the output file format is HDF (.h5 suffix) then the label names will be stored as well, otherwise the information will be lost. A mask from previous sessions can be reloaded by clicking the "Load" button for further modifications. If the results during a current session are not satisfactory then the button "Reset" will reset the mask for a new segmentation attempt. Pressing the button "Done" will close the dialog.