Class Contour
The class Contour provides a tool for extracting iso-contours from grayscale images of maps, for example,
laser scans of historical maps. The tool is designed to trace any iso-contour defined by an intensity
contrast with respect to its background.
Description:
The Contour tool is based on a first order approximation of an iso-curve. Every iso-curve
is locally searched for a linear piece that satisfies minimum intensity contrast with the local background and
some curvature constraints.
Components of the Contour Dialog:
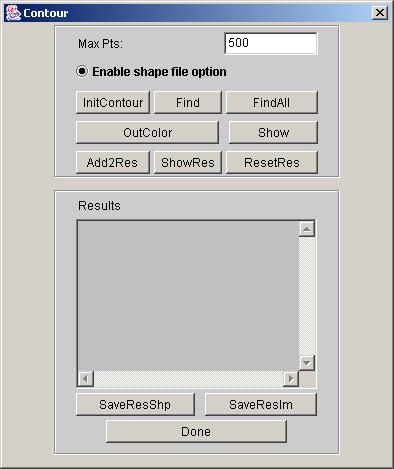
MaxPts:
This is the only edit box in the Contour Dialog. The search for a iso-contour terminates once 'MaxPts' number of points have been found.
If a iso-contour is longer than the number denoted as 'MaxPts', then, in order to extract the long iso-contour,
the 'MaxPts' number should be increased by editing the entry in the Contour Dialog.
Enable Shape file option
If the user intends to finally save the searched iso-contours as a shape file, then this option must be enabled.
However, if the user never intends to save the searched iso-contours as a shape file, then for better efficiency,
he must disable this option, so that intermediate computations for a shape file are not performed in between iso-contour traces.
InitContour
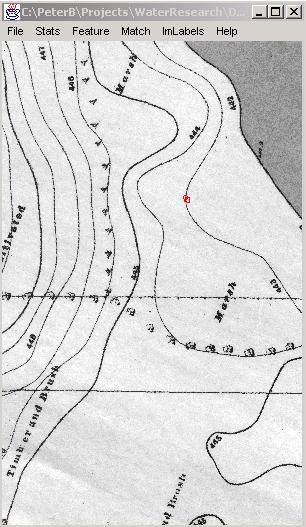
A user can click at some point in the image window and then click the 'InitContour' button to specify that
point of the image as the starting point to begin searching for an iso-contour.
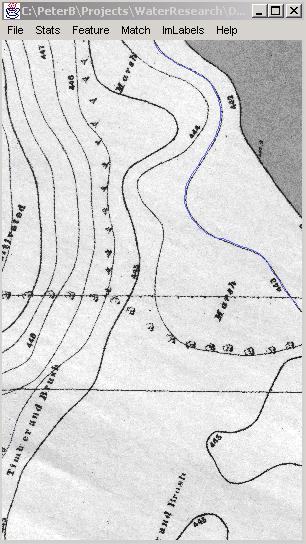
Once 'InitContour' is clicked, a small rotated region will appear overlaid on the original image
to display the initial local region of the search (see the above figure).
If the program was not able to find an initial search region in the proximity of the mouse click on the image
then a message will appear in the text area of the Contour Dialog. If the initialization of an iso-contour is
successful then the information about parameters of the initial region is provided in the text area denoted as "Results".
Find
This button is used to find a single iso-contour. The user must specify an initial point to search for the iso-contour
by clicking on InitContour before clicking on 'Find'.
OutColor
The color of iso-contours can be also changed by selecting a color after pressing "OutColor" button. The button
"OutColor" opens a color palette that allows one to choose any output iso-contour color by mouse selecting, then
previewing the color and hitting the "OK" button.
Show
This button when clicked after a 'Find', overlays the result of the iso-contour search on the original image .
The color of the overlaid iso-contour is the one selected using the OutColor button.
When clicked after a 'FindAll', it shows the initial points used during the search.
Add2Res
If the user's requirement is satisfied with a result he gets(after clicking on 'Find' and then 'Show', or after clicking
'FindAll'), he can add the result to a collection of permanent results by clicking on the 'Add2Res' button. He can keep adding results of every satisfying search.
This result can later be shown collectively with all other stored results, or it can be saved as a shape file or as an image.
ShowRes
This button will display all the results stored so far by clicking the 'Add2Res' button.
The results are overlayed on the original image but shown in a new image window.
It also displays the number of points in the iso-contour(s) and other information about the searched iso-contour(s) in the text box of the Contour Dialog.
ResetRes
This button empties the collection of permanent results stored from previous searches.
The user can use this button to start searching afresh, if he is not satisfies with the results he stored earlier by clicking 'Add2Res'.
Results
Information about the number of iso-contour points is provided in this text area of the Contour Dialog
after the 'Show' or 'ShowRes' button is activated. In addition, a classification of a iso-contour into "closed" or "open"
is performed and displayed in the text area.
SaveResShp
This button when clicked will store the currently stored iso-contours in a shape file.
SaveResIm
This button when clicked will store the currently displayed image, along with any overlayed iso-contour as a 'TIFF' file.
Done
This button terminates the Contour Dialog session.
Example Runs:
Once an image with iso-contours has been loaded to the main image window, a user can extract an iso-contour(s) in any of the following ways:
1. For a single iso-contour search: Click on a point in the image window -> click 'InitContour' -> click 'Find' -> click 'Show' -> click 'Add2Res' if he is satisfied with the result.
2. To find all iso-contours: Click 'FindAll' -> 'Add2Res' -> 'ShowRes' to see all the iso-contours found.
3. To see the intial points used in the 'FindAll' search: Click 'FindAll' -> 'Show'.
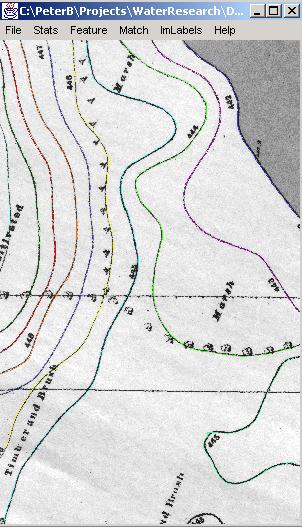
4. To view the entire collection of results stored so far: click 'ShowRes'. An example of a collection of results is shown below.
5. At any point, the user can either reset the stored results by clicking 'ResetRes' and start adding to the result afresh, or he can save the results as a shape file or image file.